FINISHING DOLL'S HOUSE FURNITURE
By Ruth Ward
Now I do not consider myself to be an expert on any form of doll's house work, whether it be the building, or the contents, but it does seem that there are many different ways to tackle any one of the jobs, and maybe, as Frank Sinatra would have said, there might be some mileage in "doing it my way!" There does not seem to be much to choose between building furniture from a kit of parts, or from scratch, so I will try to give you some of my thoughts on both approaches.
For what it is worth, I find that the first thing to do before starting any kit is to thoroughly check that each piece is as it should be, tallies with the plan and instructions, nothing is missing, wrong, or misunderstood.
When building furniture from scratch, you can just make it up as you go along, if that suits your style.
Personally, I like to cut out all of the parts, right at the beginning, and, in fact, actually make my own "kit"!
Either way works and it is really down to personal preference.
Most doll's house furniture is wood! Because of the almost "period" obsession amongst doll's house builders, modern furniture in glass, acrylic, and stainless steel, is mostly absent from the hobby. That is, perhaps, well and good, for their inclusion would bring about a plethora of other finishing techniques, some of which are beyond the amateur. Wood, however, comes in three main forms. Bare, finished, or covered.
Bare Wood
Bare wood, incorporates such items as stripped pine, or even scrubbed pine, as can often be found "below stairs", in period houses.
Here, only the basic essentials are needed for finishing. The correct type of wood is selected for the job, cut and sanded to fit and then assembled. (Or if a kit is used, just assemble the ready prepared parts.) All that is now needed is a quick coat of sealer, or lacquer, in order to stop the light wood from finger marking with handling.
Lacquers from full size furniture projects are quite suitable, here, and "left overs" can usually be scrounged from friends and neighbours who have been doing it "12 inches to the foot!" It may well pay you to thin down clear varnishes of this type, to make the degree of finish more compatible to the scale in which we work. Use the matching proprietary thinning agents for safety, as you know that these will work.
If you wish to experiment with different effects, you can try using, say cellulose thinner, or lighter fluid to thin down enamel type lacquers but try it out on some scrap wood first. Adding a small amount of talcum powder, or fine chalk dust, to gloss lacquers will reduce their sheen, right down to totally matt, dependant upon the amount that you add. Remember that we are working to a scale size which means a scale finish as well and overly glossy furniture looks out of place in these scales.
Most clear varnishes will take over glue and not show too much, but even so, care should be exercised during assembly to keep surplus glue off of the outside of the item in question. Varnishes can be applied by brush, (the better the quality, the better the finish!), or you can use the ubiquitous cotton wool buds. In this latter case, quality is also paramount, for low cost cotton buds come apart easily and leave bits behind in the finish. By far and above the best application is by use of an airbrush. It provides you with an even coat, with no brush marks!! You do not have to go to the expense of a top drawer graphics tool, quite cheap and basic airbrushes will handle this sort of job with ease.
Coloured wood
Here we have a slightly more vexed problem and a few other areas of attention should be brought to mind. At the very beginning, it should be appreciated that stains and coloured wood finishing media do not, by and large, take to dried glue! Therefore one needs to be a great deal more careful, during assembly, to keep surplus adhesive off of the outer surface of the wood. Alternatively, give some thought to the idea of using coloured glue! (All the best ideas are the simple ones!) White wood glue can be readily coloured with water based colorants, like poster paint, emulsion, and food dyes. Even spirit based wood stains sometimes work, as the amount of colorant needed is small enough not to emulsify. Remember, as always, to try it out on some scrap wood, first!!
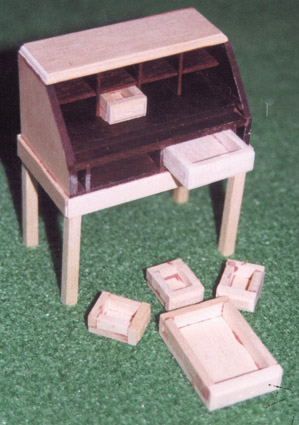
The same degree of thought needs to be given to filler. Good joints, carefully assembled should not need any filler. The Hobby's kit shown here, was a case in point. However, not all kits, and not all scratch built units are a perfect fit and the same comments apply, for very often stains and lacquers will show up these areas of filler.
It is also apparent that both the inside and the outside of the item needs to be stained.
Furthermore, most coloured wood finishes soak into end grain faster and deeper than they do to the face of the wood, causing the end grain to appear to be a much darker colour. My recommendation here, is to do a very detailed dry run on the assembly to determine any parts of the furniture, be it kit or scratch built, that need to have their inner faces coloured before assembly, as opposed to those that can be satisfactorily treated after assembly. At the same time, check, carefully on those pieces of the furniture that have exposed end grain.
Ask yourself whether these areas are acceptable to you if the colour is darker? (After all, it might be like this on "the real thing"!)
If this darker edge to the colour is unacceptable, then read on, for there are simple ways around this.
Now separate stains from lacquers! Stains penetrate the wood, but add no surface finish. Most other wood finishes, and coloured lacquers, (and some more modern acrylics!), not only add colour but also provide a surface finish, as with the clear varnishes mentioned above. It is up to you which method you use, as both produce acceptable answers.
Stains should be applied thinly and carefully and, again, either of the three methods above are applicable. Stains need to be left for at least 24 hours before trying to handle the parts. Individual parts may be stained before you stick them together and the stain should not effect the subsequent glue joint. Alternatively, if you can get at all of the relevant areas to be stained, after assembly, then you can stain it when the glue has dried and the final sanding has been completed. You can sand stained wood, but you do need to be careful and I would advise against it if you can possibly help it.
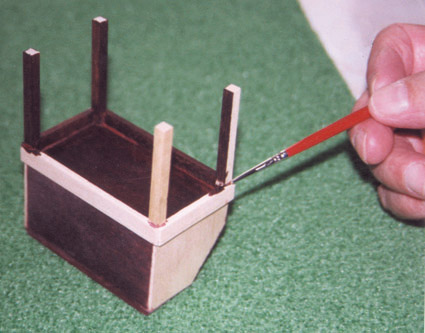
On the escritoire featured in the pictures, the dry run showed that while all of the individual drawers could be coloured after assembly, the "pigeon holes" into which they fitted needed to be dealt with before the main carcass was glued together. If you do not want overly dark edges to the end grain, try painting a very thin coat of clear lacquer, (try thinned down clear nail varnish!), onto the end grain, first, before applying the stain.
As before, it pays to try out these tricks on some scrap wood first, to ascertain the exact amounts of the various finishes that are to be used on top of one another! One point that does seem to catch out the unwary, is the fit of moving parts.
This particular piece of furniture is just such a case. Even a thin, airbrushed coat of lacquer has a finite thickness. Brushed on coats can
be even thicker!! If you do not recognise this fact at an early stage of the construction, there is every likelihood that those drawers and doors that were a perfect fit, in bare wood, will no longer fit, when stained and lacquered.
Builders beware! Allow some leeway on the parts fit, (the exact amount will depend upon the individual piece of furniture, and can be found by trial and error!), and you will find that the drawers that seemed slack, at first, now fit perfectly.
Painted wood can follow exactly the same path as above, but with the added bonus that most paints will cover up glue smears and signs of fillers. The same techniques are applicable but a primer coat first, rubbed lightly down when dry, helps to make for a better top coat. Again all application techniques are valid but the superior finish of the airbrush, will, once again, put your furniture above most others.
Whichever route you take, remember the old maxim, "Many light coats are better than one heavy coat!", and apply both colorants and surface finishes in as thin a coat as you can. You can always add another coat if you do not think that youhave gone far enough, but it isn't easy to remove "half a coat" if you've gone too far!! Once more, try reducing the gloss on gloss paints. A semi gloss finish tends to look much more realistic in these scales.
To sum up, think well ahead and plan your campaign of action. Sort out the order that you are going to follow by doing a dummy run and then select the finishing medium with which you intend to work. Carry out test pieces to ensure that you have uncovered any hidden snags and eradicated them before you begin. After that it should be plain sailing.
Upholstered Furniture
In many cases, wood is still used for the base construction but as it is often to be padded and covered up, much lower quality wood may be used. In fact balsa wood and cardboard can often be pressed into service making quite satisfactory substrates. Interior frames for upholstered furniture need not be made to quite such a high standard as stand alone wooden units, and quite often do not have to be such a perfect fit, for the individual sections are joined together, after upholstering.
Padding for upholstery, can be obtained from either arts and craft dealers, or from haberdashery stalls on the local market.
Market stalls are the source of much of my material. Soft, fluffy acrylic wadding is much cheaper on the market, and while it is much too thick in "real size", it does split down quite easily into doll's house thicknesses.
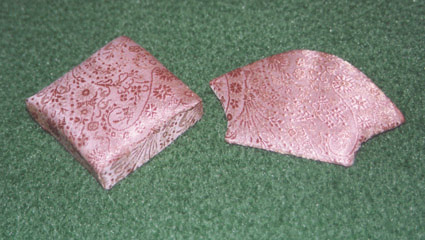
Fabrics and trimming, whilst available in a wide range of colours and styles to suit our real houses, does need to be shopped for with care. The most fundamental concern is one of colour and pattern. Bright colours appear to be overbearing, when used in the confines of a doll's house. More subtle and subdued colours seem to be more in keeping with the scale. After all, if we are thinking of scaling down the colours of wooden furniture to enable it to appear less toy like, then the same goes for fabrics. It is therefore advisable to look for quality dress making fabrics with tiny patterns or designs. (The smaller, the better!)
Trim is another matter. The braid trim on my three piece suite, (arm chair shown in the photos), is, in fact full size cord trim. However, when shopping for this cord, I was quite conscious of the fact that I was looking for cord that was made up by twisting together, several thinner cords. If you get this right, you will find that the cord can be untwisted to reveal those thinner cords, which are, themselves made up from twisted fibres, and still look right in the smaller scale.
Construction starts with a box for the main frame, padded on the top with a thin to medium layer of wadding and covered with fabric. This box can be made from card board or balsa wood. Two thicknesses of breakfast cereal boxes, glued together is more than strong enough!
I've used a variety of glues over the years, and I feel that any of the "sticky" glues, made for the hobby industry work quite well. R/C modellers adhesive, (pinched from a friend who makes model aircraft), is also well suited.
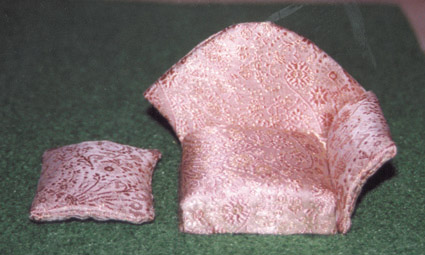
In addition, I find that double sided adhesive tape is equally good. The sides of the chairs are cardboard, the sides being scored and bent outwards at about 1/3rd down from the top, to provide the outward curve needed on this style of arm chair. (Again, balsa wood makes a good alternative, and so, too, do some of the more modern corrugated plastic sheets.) These, too, were duly wrapped with wadding and covered with fabric.
The back is made in two separate pieces, the front being balsa wood, (although any of the other materials will do!) with wadding and fabric as with the sides, The rear of the back is a separate piece of card, (cut fractionally smaller than the main back.) This piece of card has no padding and is simply covered in fabric.
The reason for all this becomes patently clear when you get to assemble the finished parts. The fabric joins on the seat should be arranged to come at the sides, and the fabric joins on the arms, on the inside, low down, so that when the arms are glued to the sides of the base, all of the joints are hidden from view. You could do this with the back as well, but many full size arm chairs and settees do feature a separate piece of fabric at the rear of the back. In our case it means that the tucked under edges of the fabric at the rear of the front of the back are hidden when the back of the back of the chair back is glued in place.
Now you can start to add the trim. The stripped down braid can either be sewn on, with the very smallest of stitches, or can be stuck on with glue. Fringes, too may be added to taste, provided that you can find some in keeping with the scale.
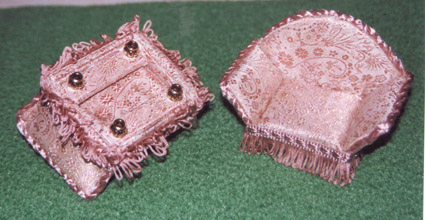
Now, I do have to hold my hand up, here, and say that my forward planning was not at it's best on the day that I made these seats. It was only when I decided to add the fringe around the bottom of the chairs and settee, that I found that I had not really made the seat part deep enough and the fringe dragged on the ground. Still, nil desperandum, as is said in informed quarters, we miniaturists are well versed in lateral thought. What the furniture needed was feet! Another quick trip to the market, (or the craft shop!), elicited some brass beads, which in 1/12th. scale look just like the sort of up market feet these chairs would have been fitted with.
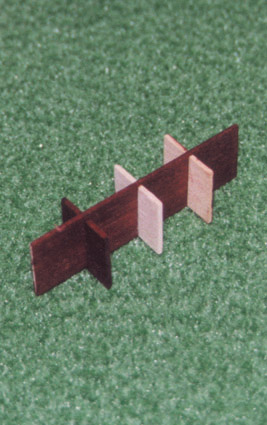
Problem solved! Well nearly!! In my case, the beads were of the right design, but not quite tall enough, and the fringe still dragged on the floor Accordingly, a couple of scraps of wood were cut to form transverse braces, covered with fabric, and set into the underside of the base, to create that little bit of extra depth that was required.
As I said at the beginning, this is not intended to be the “be all and end all” of furniture furnishing, just a few snippets of information about my techniques. Perhaps you do it differently, or maybe you have some hints and tips. If so why don’t you just jot them down and send them to Hobby’s. (Editors Note: or put them on our Facebook page!)


Visit our Showroom in West Norwood. For more information call us on 020 8761 4244

© 2017 Hobbys.